
A few months back, a client asked me a simple question: “Is our delivery tracking app leaking anything it shouldn’t?” No pentest budget, no fancy lab, just a MacBook and an afternoon. That’s the kind of situation where Charles Proxy earns its keep. It’s not the flashiest tool in a security tester’s kit, but it’s usually the first one I open, because most app problems show up the moment you can actually see the traffic instead of guessing at it.
This guide walks through the same Charles Proxy Mac setup I use for that kind of work: installing it, getting HTTPS traffic to actually decrypt (which trips up almost everyone the first time), pointing an iPhone or Android device at it, and then what to actually look for once traffic starts flowing in.
What Charles Proxy Actually Does
Charles sits between your device and the internet as a local proxy. Every request your browser, phone, or app makes routes through it first, gets logged, and shows up in a readable structure: headers, body, response, timing, all of it. Think of it as a translator that intercepts a conversation between an app and its server and writes down every word.
For plain HTTP this works instantly. HTTPS is where it gets interesting, because the traffic is encrypted before it leaves the device. Charles handles this by acting as a man-in-the-middle: it issues its own certificate, your device is told to trust that certificate, and Charles decrypts, reads, then re-encrypts traffic on the way to the real server. This is exactly the same mechanism that makes SSL validation mistakes dangerous in production apps. If an app blindly trusts any certificate presented to it, Charles (or an attacker) can sit in the middle without much resistance.
📌 Worth knowing: Charles doesn’t “hack” HTTPS. It works because your Mac (or phone) is explicitly told to trust its certificate. Remove that trust and the interception stops working immediately. That’s also why certificate pinning defeats it by default.
Here’s what that man-in-the-middle process actually looks like step by step:
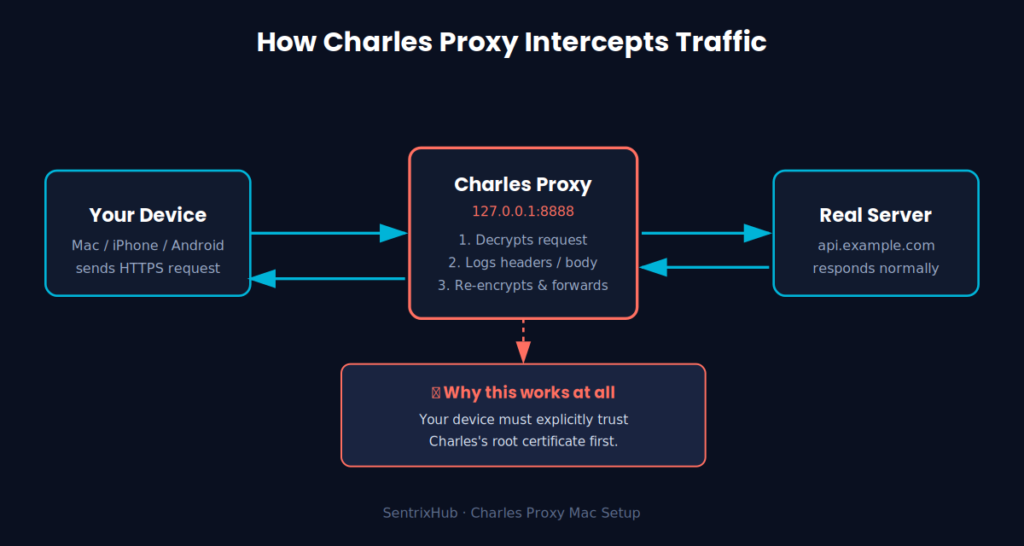
Once you understand that flow, the rest of this guide is really just “how do I get my device to trust step two.
Charles Proxy Mac Setup: Installing It the Right Way
Grab it from the official site: charlesproxy.com. The free trial runs indefinitely with a 30-minute-per-session limit (it restarts the recording, not the app), which is plenty for testing purposes.
Once it’s open:
- Charles will ask for permission to configure your Mac’s proxy settings. Allow it, this saves you a manual step later.
- Give it a minute to start capturing. Open Safari or Chrome and load any site; you should see requests populating under the Structure tab almost instantly.
- If nothing shows up, check Proxy → macOS Proxy is ticked. On newer macOS versions (Sonoma and later), System Settings sometimes silently reverts the proxy entry after a network change, and a Wi-Fi toggle fixes it faster than digging through settings.
If Charles configured things correctly, your Mac’s proxy will point to 127.0.0.1:8888. You can confirm this manually under System Settings → Network → Wi-Fi → Details → Proxies.
Getting HTTPS to Actually Decrypt
This is the step that stalls most people, including me the first time I set this up years ago. Traffic shows up in Charles but every HTTPS row just says “Unknown” instead of readable JSON.
Here’s the fix, in order:
- Go to Help → SSL Proxying → Install Charles Root Certificate.
- Open Keychain Access, find the Charles Proxy certificate under System or login, double-click it, expand Trust, and set “When using this certificate” to Always Trust.
- Back in Charles, go to Proxy → SSL Proxying Settings, enable SSL Proxying, and add
*:443(or specific domains like*.example.com:443if you want to be selective, which is recommended once you’re comfortable, since intercepting everything gets noisy fast).
Restart the browser or app after this. If you skip the “Always Trust” step in Keychain, macOS will silently keep rejecting the certificate and you’ll see connection resets instead of any error message pointing at the actual cause, which is the part that wastes the most time when you’re new to this.
If the Keychain steps above feel abstract on the page, this walkthrough shows the exact clicks in real time, from certificate install to the first decrypted request.
Once that’s working locally, the next step is pointing an actual phone at it, which is where most of the real setup friction shows up.
Here’s the same four steps laid out visually, since this is the part where most setups quietly break:
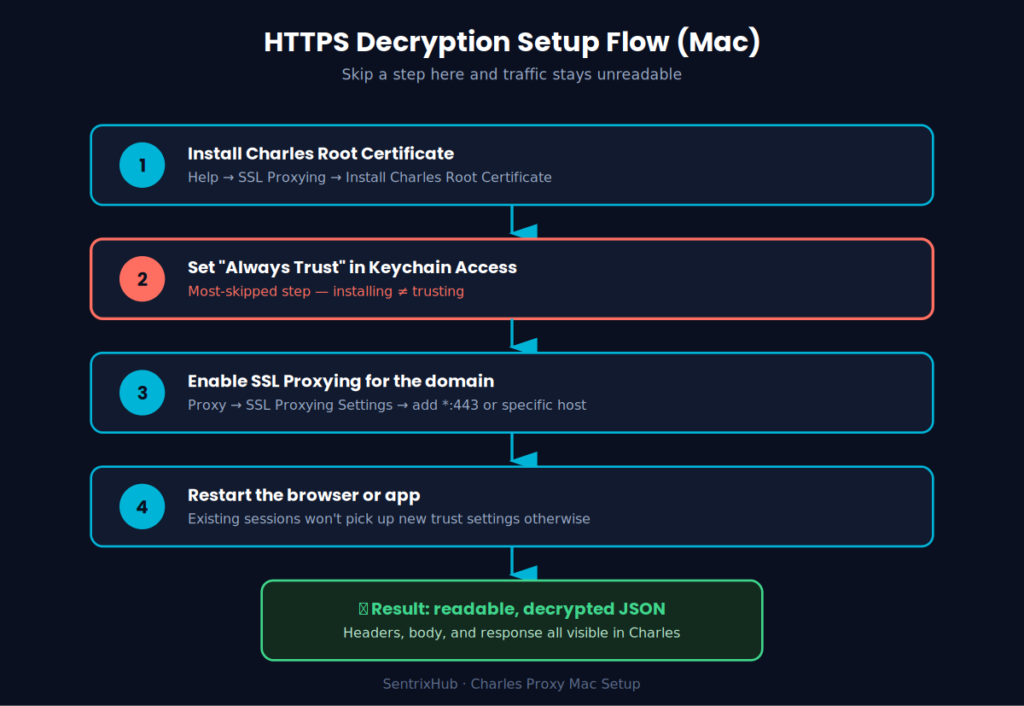
Step 2 is the one to double-check if traffic still shows up encrypted after everything else looks right.
⚠️ Remember: Adding a root certificate to “Always Trust” weakens your Mac’s certificate validation system-wide while it’s active. Remove it from Keychain once testing is done. Don’t leave a man-in-the-middle certificate trusted indefinitely on a daily-use machine.
Setting Up iOS and Android Devices
For a phone on the same Wi-Fi network as your Mac:
iOS:
- Note your Mac’s local IP (Charles shows this under Help → Local IP Address).
- On the iPhone: Settings → Wi-Fi → (i) next to your network → Configure Proxy → Manual, enter the Mac’s IP and port
8888. - Visit
chls.pro/sslin Safari on the phone to download the certificate, then install it under Settings → General → VPN & Device Management. - One step people forget: even after installing, you need to go to Settings → General → About → Certificate Trust Settings and manually enable full trust for the Charles certificate. Without this, the cert installs but does nothing.
Install and trust are genuinely two different phases on iOS. Here’s why that trips people up:
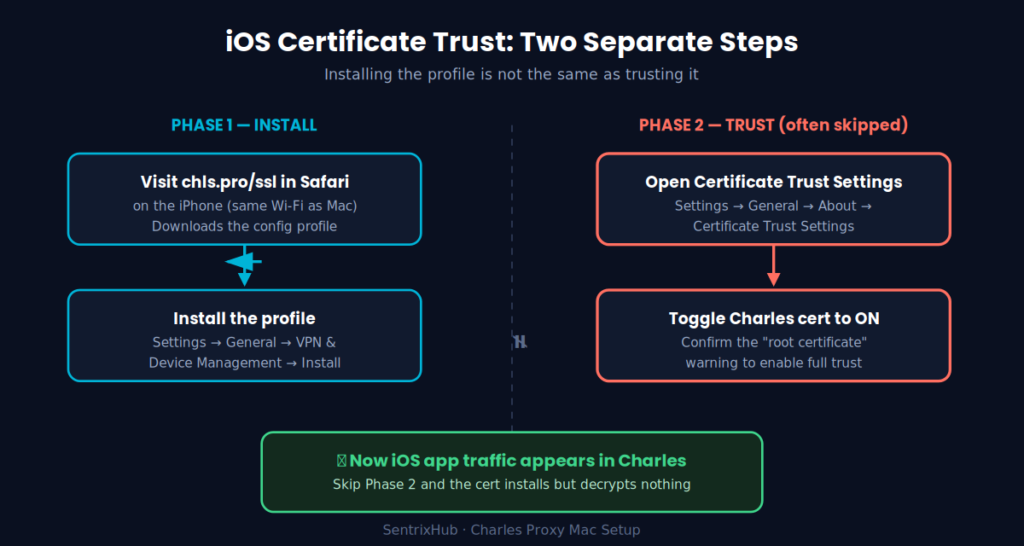
Android has a similar two-part logic, minus the extra Certificate Trust Settings screen — the CA install itself is usually the only step people miss there.
Android:
- Same manual proxy setup under Wi-Fi settings.
- Download and install the certificate as a CA cert (Settings → Security → Encryption & Credentials → Install a certificate).
- From Android 7 onward, apps that target a recent SDK version ignore user-installed CA certificates by default unless the app’s network security config explicitly allows it. This is why plenty of banking and fintech apps simply refuse to show any traffic in Charles no matter how correctly you’ve set things up. It’s not a Charles problem, it’s the app deliberately locking that door.
That last point matters more than most tutorials mention. If you’re testing an app and see zero traffic despite a correct setup, don’t assume you misconfigured something. Check whether the app pins its certificate or restricts trust anchors first.
What I Actually Look For Once Traffic Is Flowing
Setup is the boring half. The useful part is reading what comes through:
- Authentication headers: is a bearer token or session ID sitting in a header that’s identical across every request? That’s often a sign of weak session handling.
- Login and password reset flows: worth checking whether reset tokens ever leak into a URL instead of staying in the request body, which ties directly into the kind of exposure covered in password reset tokens in URLs.
- Response bodies on failed logins: apps that return different error messages for “wrong password” versus “user doesn’t exist” are handing out a free username enumeration tool.
- Endpoints that shouldn’t be reachable: sometimes an app calls an internal or admin-facing endpoint that has no business being in a consumer build.
On one job, this exact workflow surfaced a JWT token with an absurdly long expiry sitting in plain view in a request header, on an app that had no refresh-token rotation at all. Nothing exotic, just a plain proxy and five minutes of watching traffic scroll by.
✅ Best practice: Filter by domain before you start reading anything. Right-click a request → Focus, or use the search bar. Unfiltered traffic from a modern app is mostly analytics pings and ad SDK calls, and the interesting requests get buried fast if you don’t narrow it down first.
When Apps Fight Back: SSL Pinning
Plenty of apps won’t show a thing in Charles even with a perfectly correct setup, because they check the server’s certificate against a hardcoded value rather than trusting the device’s certificate store. This is certificate pinning, and it’s a deliberate defense against exactly this kind of interception.
Bypassing pinning for legitimate, authorized testing usually means instrumenting the app at runtime rather than fighting Charles harder. This is where tools like Frida hooking come in — you hook the pinning check itself and force it to return true, which is a deeper rabbit hole than Charles setup, and worth understanding separately if you’re doing this kind of testing regularly; the comparison between Frida and Xposed is a reasonable next read once you’re past the basics covered here.
It’s also worth knowing that some apps ship Runtime Application Self-Protection to detect and shut down exactly this kind of tampering. See how RASP tooling works if traffic capture keeps mysteriously failing on a specific app even after a pinning bypass.
Rewriting Requests and Setting Breakpoints
Charles isn’t just a passive logger. Two features are worth knowing early:
- Breakpoints (Proxy → Breakpoint Settings) pause a request before it reaches the server, letting you edit parameters live. Useful for testing what happens if you change a role field or a quantity value before it’s sent.
- Map Local / Rewrite lets you substitute a different response entirely, which is handy for testing how an app’s frontend handles unexpected or malformed server responses without needing backend access at all.
Both are more about testing app resilience than plain traffic reading, but once you’re comfortable with the basics they turn Charles from an observation tool into something closer to a lightweight manual fuzzer.
Doing This Legally
Everything above assumes you’re testing an app you own, or one you have explicit written authorization to test. Intercepting traffic on an app or network you don’t have permission for isn’t a gray area, it’s unauthorized access, plain and simple, the same category of risk discussed around enterprise Wi-Fi exploitation. If you’re reporting a finding to a vendor afterward, it’s worth understanding how information should be shared responsibly. The Traffic Light Protocol is the standard most security teams expect you to follow when disclosing what you found.
Common Setup Problems
| Problem | Likely Cause | Fix |
| “Unknown” traffic despite SSL Proxying on | Certificate not set to Always Trust | Recheck Keychain Access trust setting |
| No traffic from phone at all | Phone on cellular, not same Wi-Fi | Connect both devices to same network |
| App crashes after proxy set | App detects proxy, anti-tampering check | Not a Charles bug, app-level defense |
| Certificate installed but iOS still not decrypting | Trust toggle not enabled separately | Enable in Certificate Trust Settings |
Charles vs Burp Suite vs Wireshark
| Tool | Best for | Setup difficulty | Ideal use case |
| Charles Proxy | Quick traffic inspection | Easy | First look at any app's API calls |
| Burp Suite | Deep API pentesting | Moderate–Hard | Intruder, repeater, full vulnerability scan |
| Wireshark | Raw packet-level analysis | Hard | Debugging below HTTP (TCP handshake issues) |
My usual order: Charles first for a quick look, Burp if the app turns out to have something worth digging into properly.
Frequently Asked Questions
Do I need a paid Charles Proxy license for this?
No. The free trial has no feature restrictions. It just re-limits your recording session every 30 minutes, which resets automatically and doesn’t stop the proxy from working.
Why does Charles show HTTPS traffic as garbled text instead of JSON?
SSL Proxying isn’t fully enabled for that domain, or the root certificate isn’t set to Always Trust in Keychain Access. Both steps are required together.
Can Charles Proxy see traffic from apps with certificate pinning?
Not without additional work. Pinned apps reject Charles’s certificate outright. You’d need runtime instrumentation (like Frida) to bypass the pinning check first.
Is it legal to intercept my own app’s traffic?
Yes, testing traffic on an app you own or have written authorization to test is standard practice in security testing and app debugging. Testing third-party apps without permission is not.
What’s the biggest mistake beginners make with Charles Proxy on Mac?
Assuming installing the certificate is enough. On both Mac and iOS, you have to separately mark that certificate as fully trusted — installation and trust are two different steps, and skipping the second one is responsible for most “it’s just not working” reports.

Abdul Shakoor writes practical, defensive cybersecurity and networking guides for SentrixHub. He focuses on making API security, mobile app security, authentication, and network concepts simple for beginners and developers.