
If you have ever wondered why one switch in your network seems to control everything while the others quietly follow its lead, you have already run into the root bridge election process in Cisco switch environments. It is one of those STP concepts that looks simple on a slide but causes real outages when nobody bothers to configure it on purpose.
Spanning Tree Protocol exists to stop Layer 2 loops from taking down a network, and the root bridge sits right at the center of that job. Get the election wrong, and traffic starts taking the long way around, failover behavior gets unpredictable, and sometimes a random access-layer switch ends up acting as the backbone of the whole topology. None of that is theoretical. It happens whenever engineers leave STP on default settings and just assume the “right” switch will somehow win.
This guide walks through exactly how Cisco switches elect a root bridge, what Bridge ID actually contains, how BPDU timers affect the process, and how root ports and alternate ports get chosen once the root bridge is in place. If you are working through the PVST election process as well, the two topics build directly on each other, since PVST just runs this same election separately for every VLAN.
📌 Every switch starts off thinking it’s the root: Every switch running STP starts out assuming it is the root bridge. That first assumption only changes once it receives a BPDU from a neighbor advertising a lower Bridge ID. Until that happens, every switch on the segment is technically “electing itself.”
What the Root Bridge Actually Does in a Switched Network
The root bridge is the reference point that every other switch in the spanning tree topology measures itself against. It decides which paths stay active and which get blocked to prevent loops, and every non-root switch builds its forwarding decisions around the shortest path back to it. In other words, the root bridge shapes the whole Layer 2 topology, not just its own little corner of it.
It is not necessarily the most powerful switch physically, and that is exactly where things go wrong. Without manual configuration, election is left entirely to chance, based on whichever switch happens to have the lowest MAC address. A three-year-old access switch in a wiring closet can end up as the root bridge just because it was purchased before everything else, and nobody notices until performance starts degrading in a way that’s hard to explain.
Bridge ID: Priority and MAC Address Explained
Every election in Spanning Tree Protocol comes down to a single 8-byte value called the Bridge ID (BID). Understanding what’s inside the BID in STP is really the foundation for everything else in this article, so it’s worth slowing down here.
The BID has two parts. Priority is a configurable 2-byte value that defaults to 32768 and can only be adjusted in increments of 4096, and MAC address is the switch’s own hardware address, used purely as a tiebreaker when priorities match. The switch with the numerically lowest Bridge ID wins. Priority gets compared first, and since 32768 is the factory default on essentially every Cisco switch, priority ties happen constantly, which pushes the decision down to MAC address more often than most people realize.
Here’s what a Bridge ID actually looks like once you break it into its two parts:
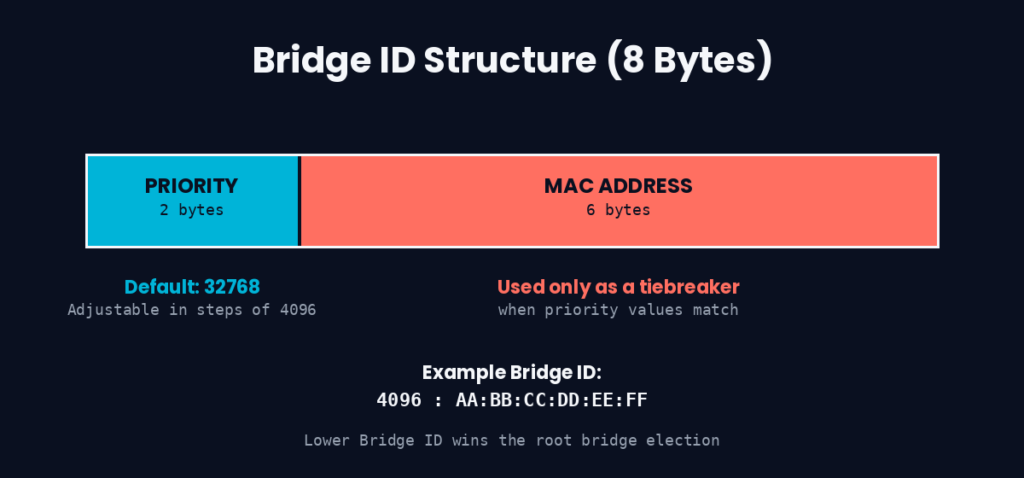
A Bridge ID combines a 2-byte priority value with the switch’s 6-byte MAC address. The lower the combined value, the better the switch’s chances of becoming root.
⚠️ Leave priority untouched, and MAC address makes the call: If you never touch the priority value on any switch in the topology, your root bridge is being chosen by MAC address alone, meaning the oldest switch on the segment usually wins by default. That is rarely the switch you would actually pick if you were choosing on purpose.
Root Bridge Election Process in Cisco Switch, Step by Step
Here’s the sequence that plays out every time STP converges, whether it’s a two-switch lab topology or a 200-switch campus network.
When a switch powers on, it starts sending Bridge Protocol Data Units out every STP-enabled port, initially advertising itself as the root bridge with a cost of 0. As BPDUs arrive from neighboring switches, each one compares the incoming Bridge ID against its own. The moment a neighbor’s BPDU carries a lower Bridge ID, the switch stops advertising itself and starts forwarding that superior BPDU instead, essentially conceding the election. This keeps happening across the network until everyone agrees on a single switch with the lowest Bridge ID. That switch becomes root, and everyone else calculates the rest of the topology relative to it.
There’s a detail that trips people up here: this doesn’t happen once and then stop. Switches keep this comparison running continuously, which is why a new switch joining the network with a lower priority than the current root can trigger a re-election on its own, sometimes without anyone touching a config.
In VLAN environments, this exact process runs independently per VLAN under PVST, which gets covered in more depth in the PVST election process explained guide. If you want to see the whole thing worked through on paper with real Bridge ID values, the STP root bridge election walkthrough covers a full numeric example.
Cisco’s own documentation backs up the same rule at the platform level: for each VLAN, the network device with the highest-priority bridge ID (the lowest numerical value) gets elected as the root bridge, and if every device is left on the default priority, the one with the lowest MAC address in that VLAN wins.
BPDU Timing and Why It Matters
BPDUs aren’t a one-time announcement. Switches keep exchanging them continuously to maintain the tree and catch changes early. On a default Cisco setup, Hello Time is 2 seconds, Max Age is 20 seconds, and Forward Delay is 15 seconds. Those numbers aren’t arbitrary; they’re the balance point between reacting to failures quickly and not flapping the topology every time a link blips for half a second.
Lowering these timers without understanding the trade-offs is one of the more common ways beginners accidentally cause instability, usually while trying to make convergence “faster.” It’s worth reading dangerous STP timer mistakes beginners make before touching any timer value in production, because the failure mode there is subtle rather than immediate.
Root Port Selection After the Root Bridge Is Chosen
Once a root bridge exists, every other switch needs to pick exactly one root port, which is simply the port with the best path back to the root. Path cost gets checked first. If two paths tie on cost, the switch falls back to comparing the sender’s Bridge ID, and if that’s also tied, it comes down to port ID as the final tiebreaker.
Choosing the wrong root port doesn’t just add a little latency. On a large topology it can send traffic across several extra hops every single time, and that adds up fast under load. The full breakdown of this logic, including cost values per link speed, lives in the root port selection guide with examples.
✅ Write down the root port you expect before you deploy: Document your intended root port on every access and distribution switch before deployment. When the actual show spanning-tree output doesn’t match what you expected, that mismatch is usually the fastest way to catch a cabling or cost misconfiguration early.
Alternate Ports and Backup Paths
An alternate port is STP’s insurance policy. It sits in a blocking state during normal operation, doing nothing, and is ready to take over the moment the primary path fails. That’s really the whole idea: redundancy without creating a loop. How fast that takeover happens depends heavily on which STP variant you’re running, since classic STP is noticeably slower to reconverge than Rapid PVST or RSTP.
This is closely tied to broader failover design, which is also where concepts like Stateful Switchover and enterprise failover stability using alternate ports become relevant, particularly in networks where downtime during reconvergence isn’t acceptable. If a root port does fail and the alternate doesn’t come up cleanly, the troubleshooting steps in what happens when the STP root port fails are the next place to look.
A Quick Walkthrough
Picture three switches on the same segment. Switch A and Switch C are both left on the default priority of 32768. Switch B has been manually set to 4096. Even though Switch B might have a newer or older MAC address than the other two, priority is compared first, so Switch B wins the election outright the moment BPDUs start flowing. Switches A and C then calculate their root ports based on whichever interface gives them the shortest path back to Switch B.
Here’s the same three-switch example laid out visually:
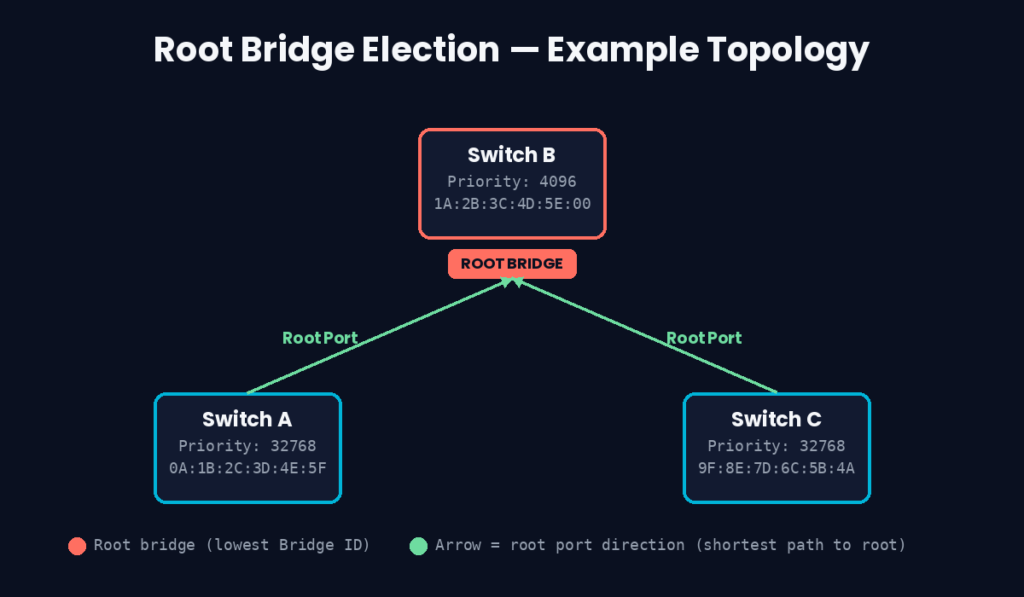
Switch B wins the election with the lowest priority (4096). Switches A and C both point their root ports back toward it, regardless of their own MAC addresses.
This is really the whole argument for manually lowering priority on your core or distribution switch instead of leaving the outcome to chance. It costs one command and removes an entire category of guesswork.
Common Mistakes That Break Root Bridge Elections
The same handful of mistakes show up in almost every misconfigured STP topology, and honestly, most of them come down to nobody ever touching the default settings. Every switch gets left at priority 32768, nobody bothers configuring a primary and secondary root bridge on purpose, and the root bridge ends up sitting at the edge of the network instead of the core simply because that’s wherever the oldest MAC address happened to be. Add to that a habit of only checking show spanning-tree after something has already broken, and you get a topology that technically works until the day it doesn’t.
Left unchecked, these mistakes tend to surface as intermittent instability rather than a hard outage, which makes them harder to diagnose after the fact. For a broader look at how minor port-level misconfigurations cascade into bigger problems, see why STP port misconfigurations break networks.
Best Practices for Configuring Root Bridge on Cisco Switches
Set priority manually rather than hoping MAC addresses line up the way you want. The command is straightforward: spanning-tree vlan <id> root primary on your intended root switch, and root secondary on the backup. This alone removes most of the unpredictability discussed above.
Beyond that, design around the core, not the edge. The root bridge should sit at the logical center of the network, typically a core or distribution switch, never an access switch serving end users. And don’t just configure it once and walk away. Run show spanning-tree regularly, especially after any topology change, to confirm the root bridge and root ports still match what you designed.
There’s one more piece that has nothing to do with STP logic directly but still matters: whoever has CLI access to a core switch can change its priority and quietly take over the root bridge role. A quick pass through a login security checklist for switch and router management interfaces is worth doing alongside your STP design, and pairing it with a password strength checker for admin credentials closes a gap that’s easy to overlook.
⚠️ A clean STP design doesn’t protect a weak admin password: A well-designed root bridge election means nothing if the switch’s management interface is protected by a weak or default password. STP security and access security are two separate problems, but they sit on the same device.
In larger environments running overlay technologies, root bridge placement also interacts with broader design decisions, including how DMVPN scales in large networks and how core hardware lifecycle affects long-term stability, which matters if you’re still running gear nearing end of life like the Cisco ISR 4451-X.
Conclusion
None of this is particularly hard once it clicks, but it’s the kind of thing engineers skip until a switch goes down and they’re staring at a show spanning-tree output trying to figure out why traffic is taking a route that makes no sense. Two commands, root primary and root secondary, are usually all it takes to avoid that conversation entirely.
If you’re working through the VLAN-specific side of this, the PVST election process explained is the natural next stop, and STP port states in networking is worth a read if you want to see what actually happens to a port while convergence is in progress.
Frequently Asked Questions
What is the root bridge in a Cisco switch?
The root bridge is the switch selected as the central reference point for the spanning tree topology. Every other switch calculates its path back to this switch to determine which ports forward traffic and which stay blocked.
How is the root bridge elected in STP?
Switches compare Bridge IDs carried in BPDUs. The switch advertising the lowest Bridge ID, priority first, then MAC address as a tiebreaker, becomes the root bridge.
What is a Bridge ID in STP?
Bridge ID is an 8-byte value combining a configurable priority (default 32768) and the switch’s MAC address. It is the single value STP uses to decide the root bridge.
How often are BPDUs sent?
By default, every 2 seconds, based on the Hello Time timer.
What’s the difference between a root port and a designated port?
The root port is a switch’s best path toward the root bridge. A designated port is the port responsible for forwarding traffic onto a specific network segment, one per segment.
What is an alternate port in STP?
A backup port that stays in blocking state during normal operation and becomes active only if the primary (root) path fails.
Do I need to manually configure the root bridge, or is the default fine?
Technically STP will elect a root bridge on its own using default priorities, but relying on that means an unpredictable switch, often just the oldest one on the segment, ends up controlling your topology. Manually setting root primary and root secondary is standard practice in any production network.

Abdul Shakoor writes practical, defensive cybersecurity and networking guides for SentrixHub. He focuses on making API security, mobile app security, authentication, and network concepts simple for beginners and developers.